Physical Address
304 North Cardinal St.
Dorchester Center, MA 02124
Physical Address
304 North Cardinal St.
Dorchester Center, MA 02124

The Lifer is a boss that is difficult to find and very difficult to defeat Wuthering wave Rinacista, thanks to its unique location and diverse enthusiasts. Here’s a step-by-step explanation of how to find and overcome it.
Lifer is located in the middle of the huge maze located in the heart of the city Vagasia Peninsula area, inside Oakhart Haycourt. This location makes up most of the entire area in terms of size, and is difficult to navigate, especially since some shenanigans are involved in getting to the center. More on that soon.
When you lay your eyes on this huge maze, your first instinct may be to use… Flight aid To fly over the walls. Unfortunately, those illusions I just mentioned will prevent you from doing this: you will reach the center, but you will reach a dead end every time. Instead, you have to enter the maze At the designated entrance Follow the navigation path placed in front of you to reach the appropriate center.
Start by heading to Fagaceae Peninsula, Oakhart Highcourt Ringing beacon. Teleporting to it puts you directly in front of the correct entrance.
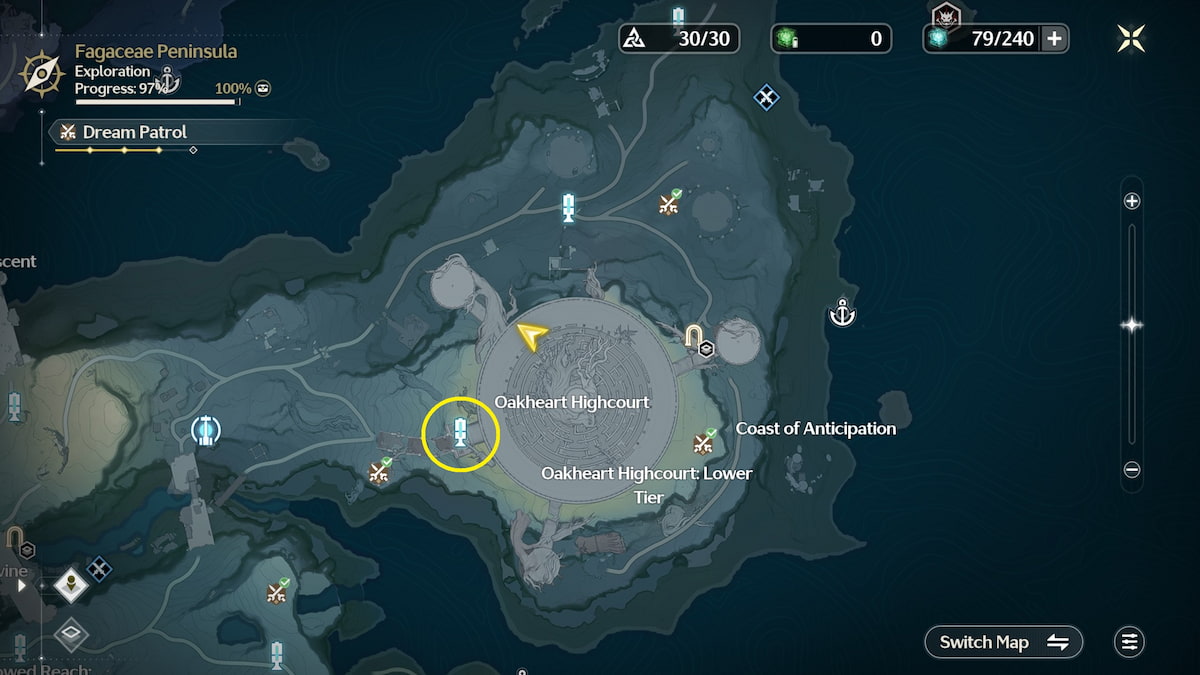
You’ll know you’re in the right place if you see this ominous statue in front of you.

Make your way through the doorway behind the statue and interact with the stone slab before progressing further.

The board talks a little about the lore of the maze, but the important part is in parentheses: you have to follow the path of the boards scattered throughout the maze to get to the life in the middle.
Once you’re done looking at the tablet, move forward through it, following the path. Do not take the leftmost turning area.

You want to keep heading towards the inner section of the maze for now, so make sure the path you take does just that. You’ll likely encounter many enemies on your way, so take care of them when they appear. Continue following the path until you reach the next one Stone tablet On the ground and then interact with it.

This is where things can get confusing. The road to follow is now paved thanks to Three panels overflow the areawhich you must solve to advance. Make a mental note of how you will access the tablet before continuing.
Now, the first flowing color palette is At the top of the tree above the mazein the central platform that holds up. Climb the tree (or use fly) until you reach the platform itself.

The last two panels are located completely outside the maze, in The towers overlooking and surrounding it. Insert the tops of each and solve the puzzle in the middle.


Once all three excess panels are resolved, you will get a scene depicting the return of color to the area. Gameplay-wise, golden swirls will surround the entire area above the maze, allowing you to use flight indefinitely as long as you stay within the golden path. This is the main indicator that you are ready to enter the inner section of the maze and face the savior.

Return to the tablet you left behind earlier. Go back through the main entrance and retrace your steps if you’re having trouble getting back to it from the top. From the tablet, go left and take the first left turn you come across.

The moment you take the turn, turn right and follow the path around you. Do not continue left once you have cleared the walls around the turn. Follow the surrounding path and take the next right you come across, heading towards the inner parts of the maze.

Ignore the next left turn and walk through the maze door on your right until you reach the second left turn in the area. You’ll know you’re in the right place when you see another stone slab nearby.

Interact with the tablet, then follow the path leading away from the center of the maze. Once you hit the back wall, take the next right turn.

From here, follow the path all the way until you see the following Stone tablet will interact with. You will know you are in the right place if the area is lit up with golden light.

Follow the path towards the golden light, and make your way to Final stone disc. Behind it there is an open entrance that leads into the depths of the maze. Take the step and you will find yourself face to face with life.

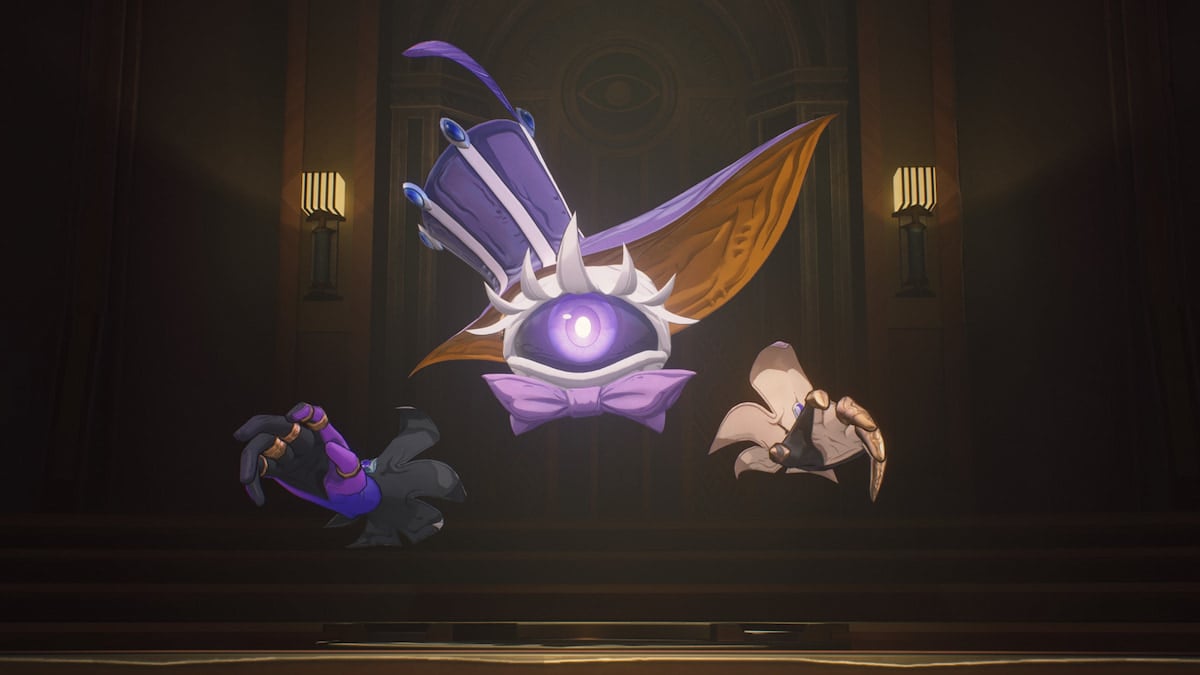
The Lifer is an extremely powerful enemy in Wuthering Wavesthanks to the ridiculous number of reinforcements he has access to at any given time. However, before you can face her in combat, you’ll need to play her game first.

The game is a strange mix of tic-tac-toe and chess. The Lifer controls the white pieces while you control the black pieces. Your goal is to line up your pieces. You can either beat the Lifer at his own game to reap the rewards – a difficult task that will likely require several attempts – or the tried-and-true method of combat. After several rounds of failing to play the game, you’ll have the option to play it directly instead.

Selecting this option will initiate direct combat, but before you do so, note that the Savior has already done so 300% enemy power. This means that fighting it now will result in a very difficult confrontation that you are likely to lose. However, you can weaken him significantly by disabling most of his buffs.

Disabling Lifers’ buffs is directly related to playing Tic-Tac-Toe, although your goal isn’t to win this time. If you look around the Lifer’s room, you’ll notice several doors, including one behind it. These doors all lead to different previously inaccessible areas of the maze. Some of them also lead to sites where you can Remove buff from Lifer. You can determine which doors lead to areas associated with Lifer buffs using sensor And follow up Purple path reveals.

These doors can be opened by Line up your black piece with any of them. Doing so will open the initial door and clear the entire path to the outside of the maze to an area you couldn’t access before. You can do this for any of the doors in the center.

Once the door is open, follow the path to the back and find a spot Lounge In the region.

Interacting with the device will allow you to disable a number of Lifer buffs. You may need to find Master piece Around the area with the terminal before you can do this. Each station has one located in the same room.
Once you are satisfied with the number of boosts removed from the Lifer, you can engage him in combat and defeat him quite easily. Ignoring the buffs, Lifer is just plain good chop chopwith a very similar moveset.

Of course, if you’re looking for a challenge, you can also engage Lifer with all his boosts enabled. This will require a lot of firepower and constant DPS, as Lifer will heal itself if you take too long to deal damage. He is also extremely durable, able to block some of the most powerful attacks in the game with ease.